> For the complete documentation index, see [llms.txt](https://docs.ilert.com/llms.txt). Markdown versions of documentation pages are available by appending `.md` to page URLs; this page is available as [Markdown](https://docs.ilert.com/integrations/inbound-integrations/sentinelone.md).

# SentinelOne Integration

Send SentinelOne threats to ilert with the Singularity Webhook: each threat opens one alert, and an optional Hyperautomation workflow accepts and resolves it when analysts change the threat's status.

[SentinelOne](https://www.sentinelone.com/) protects endpoints, cloud workloads, and identities, and raises a threat for each malicious or suspicious detection. The Singularity Webhook app in SentinelOne posts those threats to a SentinelOne alert source in ilert. Each threat opens one alert, and the alert source's escalation policy notifies the on-call responder.

The Singularity Webhook sends a threat only when it is detected. To accept and resolve the alert in ilert when an analyst works the threat in SentinelOne, add the optional [Hyperautomation workflow](#in-sentinelone-sync-threat-status-to-ilert-optional).

## Requirements

* Permission to install apps from the **Singularity Marketplace** in the SentinelOne console.
* For the status sync: access to **Hyperautomation** in the same console.

## In ilert: Create a SentinelOne alert source

1. Go to **Alerting** → **Alert sources** and click **Create new alert source**.
2. Search for **SentinelOne**, click its tile, and click **Next**.
3. Give your alert source a name, optionally assign teams, and click **Next**.
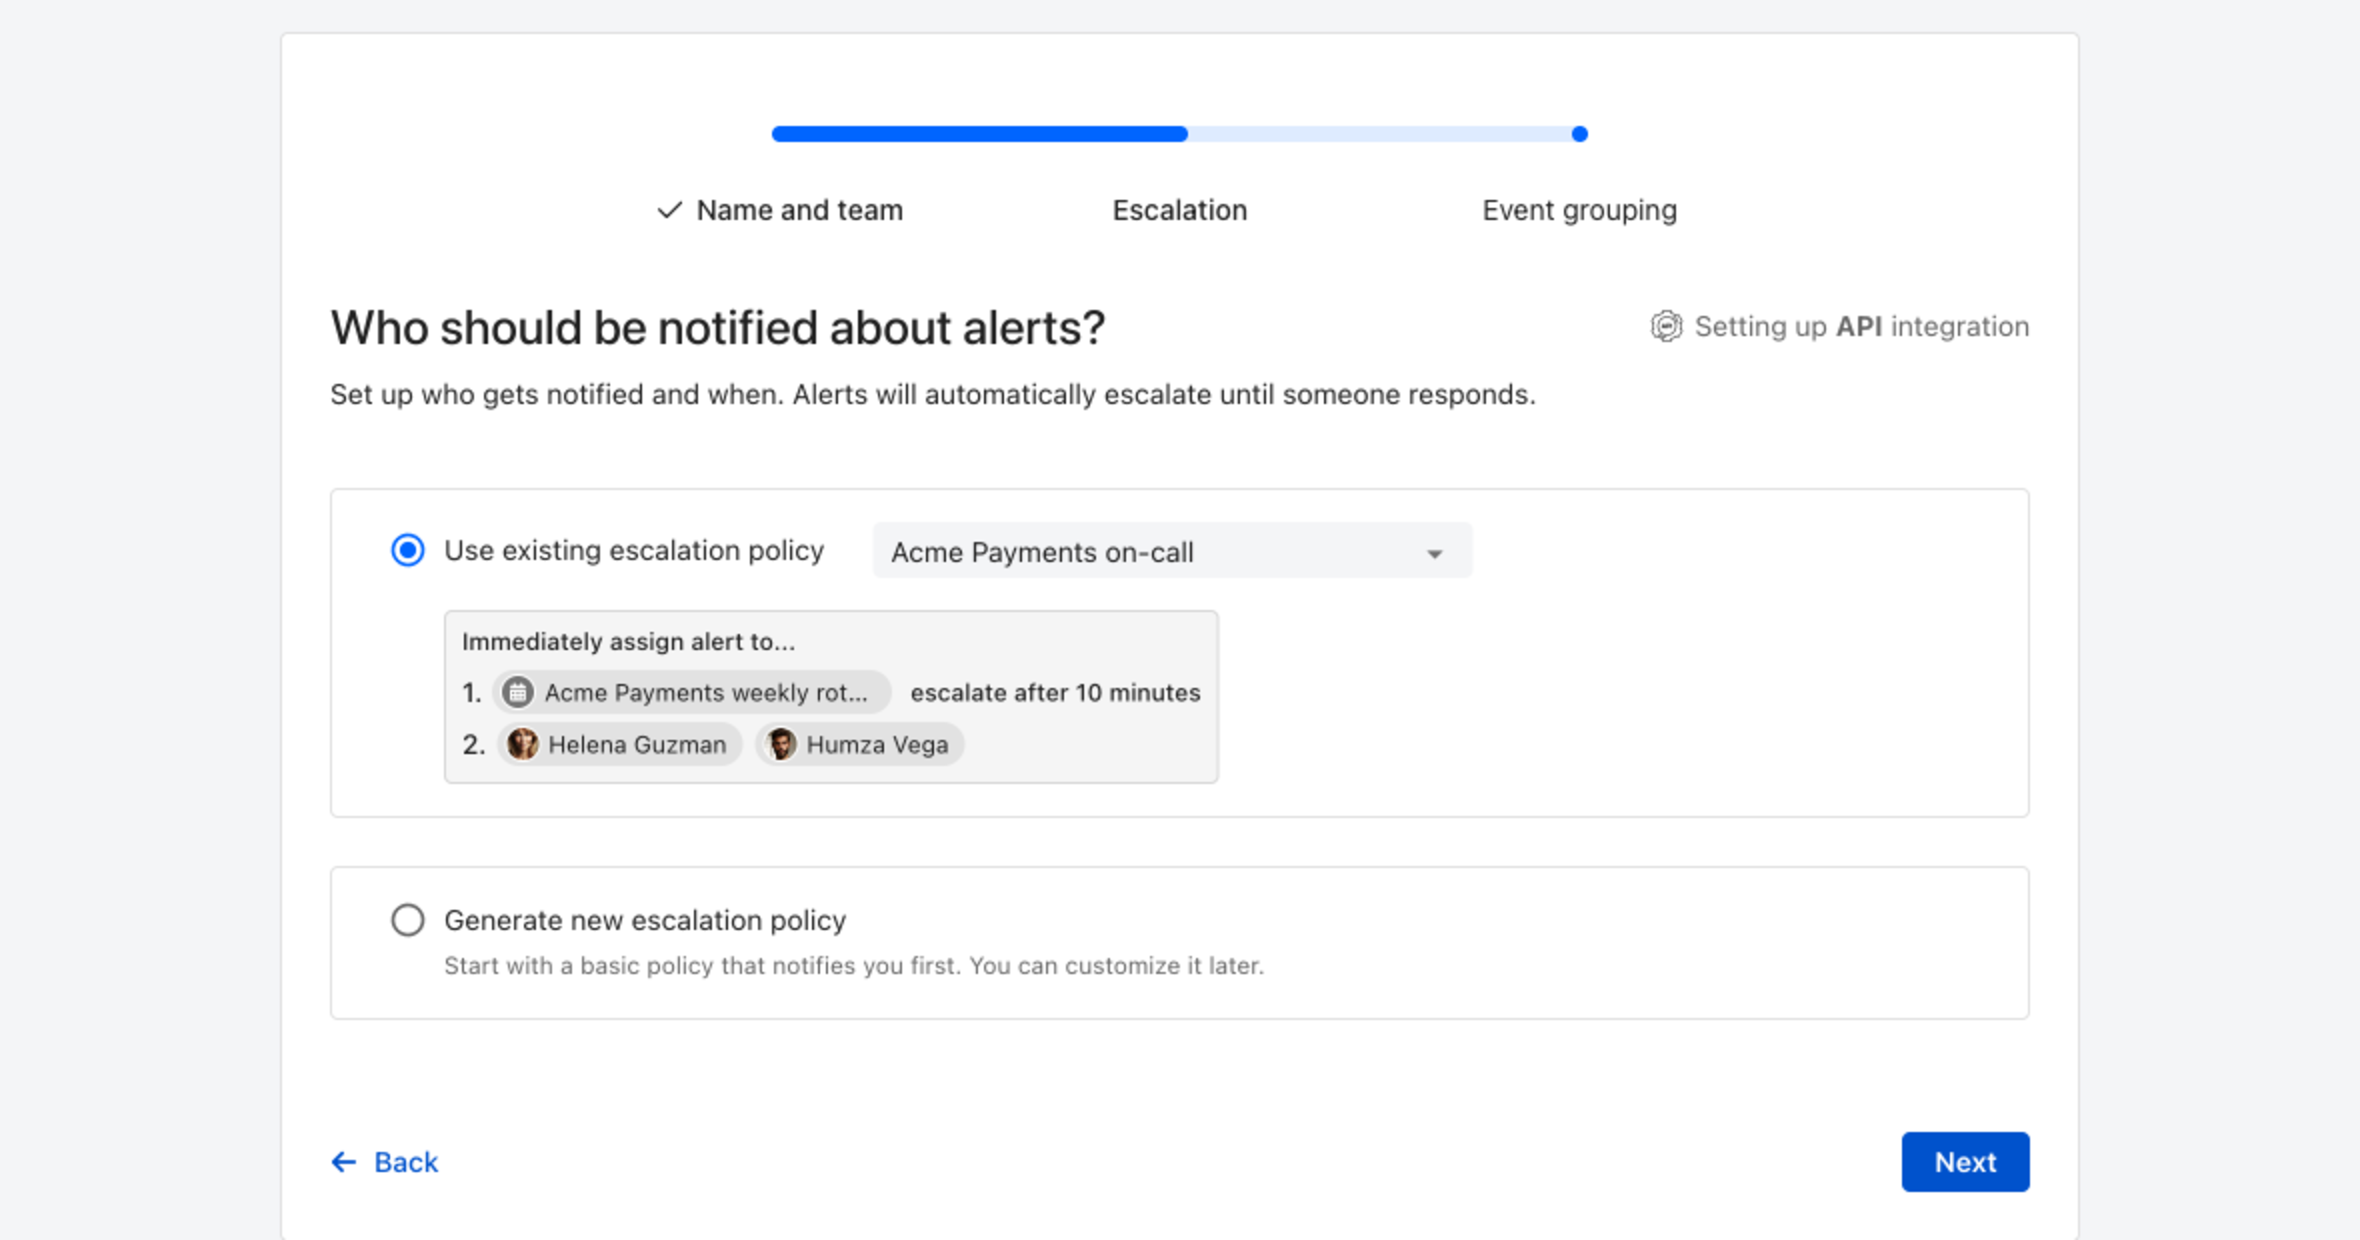
4. Choose who gets notified: select **Use existing escalation policy** and pick a policy, or **Generate new escalation policy** to start with a basic one that notifies you first. Click **Next**.

   <figure><img src="https://3394882078-files.gitbook.io/~/files/v0/b/gitbook-x-prod.appspot.com/o/spaces%2F-M76ygPnS4HUcFSX8ulm%2Fuploads%2Fgit-blob-8a281bf3931f5a1a531951ce97984d50989dd875%2Falert-source-escalation-step.png?alt=media" alt="The escalation step of the ilert alert source wizard, headed Who should be notified about alerts, with an escalation policy selected and a preview of its escalation rules below."><figcaption><p>Pick an existing escalation policy, or generate a basic one without leaving the wizard.</p></figcaption></figure>
5. Select **Default grouping** and click **Continue setup**. It groups events by the alert key the integration sets from the SentinelOne threat ID, so each threat becomes one alert. The other [grouping options](https://docs.ilert.com/alerting/configure-alerting/alert-sources.md#event-grouping) are easier to judge once events are arriving.
6. The next page shows more settings, such as notification priority and alert templates. Click **Finish setup** for now; you can change them later.
7. On the final page, ilert shows the **SentinelOne URL** for this alert source. Copy it; you will paste it into SentinelOne in the next sections.

## In SentinelOne: Send threats to ilert

1. In the SentinelOne console, click **Marketplace** in the top bar.

   <figure><img src="https://3394882078-files.gitbook.io/~/files/v0/b/gitbook-x-prod.appspot.com/o/spaces%2F-M76ygPnS4HUcFSX8ulm%2Fuploads%2Fgit-blob-01b1f726d2d4c393d6029eb54a146120efae395c%2Fsentinelone-marketplace-link.png?alt=media" alt="The SentinelOne console on the Dashboards page. The Marketplace link in the top bar, between Prompt Security and Help, is highlighted."><figcaption><p>The Singularity Marketplace opens from the top bar of the console.</p></figcaption></figure>
2. In the **Catalog**, search for **Singularity Webhook** and click its tile.

   <figure><img src="https://3394882078-files.gitbook.io/~/files/v0/b/gitbook-x-prod.appspot.com/o/spaces%2F-M76ygPnS4HUcFSX8ulm%2Fuploads%2Fgit-blob-495e70d41420353e4abfef5fd8377f9f23920764%2Fsentinelone-marketplace-search.png?alt=media" alt="The Catalog tab of the Singularity Marketplace, filtered by the search term webh. One tile is shown: Singularity Webhook by SentinelOne, tagged Automation."><figcaption><p>The Singularity Webhook is published by SentinelOne.</p></figcaption></figure>
3. Under **Available Integrations**, click **Install**. If the Singularity Webhook is already installed, open its **Configuration** tab and click **Add Configuration** instead.

   <figure><img src="https://3394882078-files.gitbook.io/~/files/v0/b/gitbook-x-prod.appspot.com/o/spaces%2F-M76ygPnS4HUcFSX8ulm%2Fuploads%2Fgit-blob-4118d8f11872a3913a9327985d7e37b7ae32b9b8%2Fsentinelone-singularity-webhook-install.png?alt=media" alt="The Singularity Webhook page in the Singularity Marketplace. Under Available Integrations, the Install button next to the Singularity Webhook application is highlighted."><figcaption><p>Each configuration of the webhook covers one scope.</p></figcaption></figure>
4. In **Add Configuration**, set **Scope of Access** to the account or site whose threats should reach ilert.
5. Under **Response Actions**, turn on **Make Response Actions available as "Manual Response Actions" from Threats**. This also lets you send any existing threat to ilert by hand, which you use to [verify the integration](#verify-the-integration).

   <figure><img src="https://3394882078-files.gitbook.io/~/files/v0/b/gitbook-x-prod.appspot.com/o/spaces%2F-M76ygPnS4HUcFSX8ulm%2Fuploads%2Fgit-blob-e06ab4f8d378b27abf7deaf97f226355e13669f6%2Fsentinelone-webhook-add-configuration.png?alt=media" alt="The Add Configuration dialog of the Singularity Webhook, with Scope of Access set to an account and the Select site menu next to it. The Response Actions toggle is on, and Threat Response Action 1 is expanded below Advanced, followed by Threat Response Actions 2 to 5."><figcaption><p>Pick the account, or a site within it, at the top of the dialog.</p></figcaption></figure>
6. Expand **Threat Response Action 1** and set these fields:

   | Field                                    | Value                                                                                                                                            |
   | ---------------------------------------- | ------------------------------------------------------------------------------------------------------------------------------------------------ |
   | **Threat Response Action 1 Name**        | `ilert`                                                                                                                                          |
   | **Threat Response Action 1 Description** | Optional, for example `Notify on-call in ilert`                                                                                                  |
   | **Automation Trigger Options**           | **All Threats**. The default, **No Automated Actions**, sends nothing on its own; threats then reach ilert only when you run the action by hand. |
   | **URL**                                  | The **SentinelOne URL** from ilert                                                                                                               |
   | **Action**                               | `POST`                                                                                                                                           |
   | **Webhook Request Body**                 | **Full Threat Details**                                                                                                                          |

   <figure><img src="https://3394882078-files.gitbook.io/~/files/v0/b/gitbook-x-prod.appspot.com/o/spaces%2F-M76ygPnS4HUcFSX8ulm%2Fuploads%2Fgit-blob-ae6ba990d56f577bdd261e75490a226024751e58%2Fsentinelone-webhook-threat-response-action.png?alt=media" alt="Threat Response Action 1 of the Singularity Webhook, filled in: Name ilert, Automation Trigger Options All Threats, an empty URL field ready for the SentinelOne URL, Action POST, and Webhook Request Body Full Threat Details."><figcaption><p>Paste the <strong>SentinelOne URL</strong> into <strong>URL</strong>.</p></figcaption></figure>
7. Click **Install**.

**Webhook Request Body** must be **Full Threat Details**. ilert reads the threat ID, name, and status from the `threatInfo` object in that body, and rejects a body without it with HTTP 400.

## Verify the integration

In SentinelOne, open an existing threat and run the **ilert** manual response action on it. Within a few seconds, an alert appears under **Alerts** in ilert, named after the threat and the endpoint, for example `ilert-s1-test on build-agent-01`. Open **Alert sources** → your SentinelOne alert source → **Alert source logs** to see each received event.

## In SentinelOne: Sync threat status to ilert (optional)

The Singularity Webhook does not send a threat again when its status changes. This Hyperautomation workflow does: it sends the threat to ilert each time its alert's status changes in SentinelOne, and ilert accepts or resolves the matching alert.

1. In the SentinelOne console, go to **Hyperautomation** → **Workflows** and click **Create New Workflow**.

   <figure><img src="https://3394882078-files.gitbook.io/~/files/v0/b/gitbook-x-prod.appspot.com/o/spaces%2F-M76ygPnS4HUcFSX8ulm%2Fuploads%2Fgit-blob-9ff6b69336ce1c2707bca9db807d1cf2018bcb8f%2Fsentinelone-hyperautomation-create-workflow.png?alt=media" alt="The Workflows tab of Hyperautomation in the SentinelOne console. Hyperautomation in the sidebar, the Workflows tab, and the Create New Workflow button are highlighted."><figcaption><p>Hyperautomation is in the sidebar of the console.</p></figcaption></figure>
2. Under **Select Trigger**, select **Singularity Response Trigger** and click **Create**.

   <figure><img src="https://3394882078-files.gitbook.io/~/files/v0/b/gitbook-x-prod.appspot.com/o/spaces%2F-M76ygPnS4HUcFSX8ulm%2Fuploads%2Fgit-blob-2be36b2db98ba69606fd164b984619543bca85a6%2Fsentinelone-hyperautomation-select-trigger.png?alt=media" alt="The Select Trigger dialog listing Singularity Response Trigger, HTTP Trigger, Schedule Trigger, Manual Trigger, and Email Trigger. Singularity Response Trigger is highlighted."><figcaption><p>The Singularity Response Trigger starts the workflow on events in the console.</p></figcaption></figure>
3. The workflow editor opens with the trigger selected. In its panel, click **Add Event Filter** and select **Alert**.

   <figure><img src="https://3394882078-files.gitbook.io/~/files/v0/b/gitbook-x-prod.appspot.com/o/spaces%2F-M76ygPnS4HUcFSX8ulm%2Fuploads%2Fgit-blob-71d0c9d9a211a32a1554f7433236be17f79c5f37%2Fsentinelone-trigger-add-event-filter.png?alt=media" alt="The Hyperautomation workflow editor with the Singularity Response Trigger on the canvas. In the side panel, the Add Event Filter menu is open with the entries Alert, Misconfiguration, Vulnerability, and Activity."><figcaption><p>Filter on <strong>Alert</strong>; SentinelOne raises an alert for each threat.</p></figcaption></figure>
4. Set the filter to **Run Automatically**, leave it **Enabled**, and set the condition **Status** to **updated**.

   <figure><img src="https://3394882078-files.gitbook.io/~/files/v0/b/gitbook-x-prod.appspot.com/o/spaces%2F-M76ygPnS4HUcFSX8ulm%2Fuploads%2Fgit-blob-20bfd408938ec1166a941043f836d2ecb7f31b15%2Fsentinelone-trigger-event-filter.png?alt=media" alt="The Singularity Response Trigger panel with one event filter: Alert, set to Run Automatically and Enabled, with the condition Status updated."><figcaption><p>The workflow runs each time an alert's status changes.</p></figcaption></figure>
5. Click **+** below the trigger and select **Variable**.

   <figure><img src="https://3394882078-files.gitbook.io/~/files/v0/b/gitbook-x-prod.appspot.com/o/spaces%2F-M76ygPnS4HUcFSX8ulm%2Fuploads%2Fgit-blob-118c414518da87de22bee34fe9064f7808fd49ab%2Fsentinelone-workflow-add-variable.png?alt=media" alt="The action picker of the Hyperautomation workflow editor, listing core actions. Variable, the first entry, is highlighted."><figcaption><p>The <strong>+</strong> below a step opens the action picker.</p></figcaption></figure>
6. In the **Variable** panel, set **Name** to `ilert_body` and **Value** to:

   ```
   {{Function.JQ(singularity-response-trigger.data, "{ threatInfo: { threatId: .externalId, threatName: .name, incidentStatus: .status, analystVerdict: .analystVerdict, confidenceLevel: .confidenceLevel, sha1: .process.file.sha1, sha256: .process.file.sha256 }, agentRealtimeInfo: { agentComputerName: .asset.name }, alert: { id: .id, severity: .severity, description: .description, product: .detectionSource.product } }", true)}}
   ```

   Building the body with `Function.JQ` keeps it valid JSON when a threat lacks a field, such as a file hash, and escapes special characters in threat and endpoint names. Three details matter:

   * Keep the spaces inside the braces. Hyperautomation reads `}}` as the end of the expression, so `.product}}` would cut it short.
   * `threatId` must be `.externalId`, the threat ID. `.id` is the SentinelOne alert ID and matches no alert in ilert.
   * If you renamed the trigger step, replace `singularity-response-trigger` with its new name in kebab case.

   <figure><img src="https://3394882078-files.gitbook.io/~/files/v0/b/gitbook-x-prod.appspot.com/o/spaces%2F-M76ygPnS4HUcFSX8ulm%2Fuploads%2Fgit-blob-98db4523f08d2b1e97589e2cff6e340cd8e2561a%2Fsentinelone-workflow-variable-ilert-body.png?alt=media" alt="The Variable panel of the workflow, with the Name ilert_body and a Value that starts with Function.JQ applied to singularity-response-trigger.data. The Variable step sits below the trigger on the canvas."><figcaption><p>Paste the value from the code block above; the field scrolls sideways.</p></figcaption></figure>
7. Click **+** below the **Variable** step and select **Send HTTP Request**.

   <figure><img src="https://3394882078-files.gitbook.io/~/files/v0/b/gitbook-x-prod.appspot.com/o/spaces%2F-M76ygPnS4HUcFSX8ulm%2Fuploads%2Fgit-blob-ecefc58fab6e5336325ed137776f255a896a7147%2Fsentinelone-workflow-add-http-request.png?alt=media" alt="The action picker of the Hyperautomation workflow editor. Send HTTP Request, a core action, is highlighted."><figcaption><p><strong>Send HTTP Request</strong> is a core action, so it needs no integration.</p></figcaption></figure>
8. In the **Send HTTP Request** panel, set:

   | Field       | Value                                                 |
   | ----------- | ----------------------------------------------------- |
   | **URL**     | The **SentinelOne URL** from ilert                    |
   | **Method**  | `POST`                                                |
   | **Headers** | `Content-Type`: `application/json`                    |
   | **Body**    | **JSON**, with the content `{{local_var.ilert_body}}` |

   <figure><img src="https://3394882078-files.gitbook.io/~/files/v0/b/gitbook-x-prod.appspot.com/o/spaces%2F-M76ygPnS4HUcFSX8ulm%2Fuploads%2Fgit-blob-0778b090f9c22e3d2ee23a870e05a88a9bdb1486%2Fsentinelone-workflow-http-request.png?alt=media" alt="The Send HTTP Request panel of the workflow, with an empty URL field marked Required, Method POST, collapsed URL Parameters and Headers sections, and the Body set to JSON with the content local_var.ilert_body. The canvas shows the trigger, the Variable step, and the Send HTTP Request step in a column."><figcaption><p>The finished workflow: trigger, <strong>Variable</strong>, then <strong>Send HTTP Request</strong>.</p></figcaption></figure>
9. Click **Activate** in the top bar.

To check the sync, set the threat you used to [verify the integration](#verify-the-integration) to **In Progress** in SentinelOne, and send it to ilert again first if you already resolved its alert. The alert in ilert changes to **Accepted**. Set the threat to **Resolved**, and the alert is resolved.

Each status change maps like this:

| SentinelOne threat status                                 | ilert alert                                                                              |
| --------------------------------------------------------- | ---------------------------------------------------------------------------------------- |
| **In Progress**                                           | Accepted. Escalation stops, because a responder now owns the threat.                     |
| **Resolved**                                              | Resolved                                                                                 |
| Any other status, for example when the threat is reopened | Added to the open alert's timeline, or a new alert opens if the previous one is resolved |

## FAQ

### Will alerts in ilert be resolved automatically?

Yes, if you add the [Hyperautomation workflow](#in-sentinelone-sync-threat-status-to-ilert-optional). ilert resolves the alert when the threat is set to **Resolved** in SentinelOne. Without the workflow, resolve the alert in ilert.

### Does accepting or resolving the alert in ilert change the threat in SentinelOne?

No. The integration sends data one way, from SentinelOne to ilert.

### Can I change the alert summary, details, or priority?

Yes. The alert source receives the full threat as SentinelOne sends it, for example `threatInfo.threatName`, `threatInfo.classification`, `threatInfo.filePath`, `threatInfo.sha256`, and `agentRealtimeInfo.agentComputerName`. Use these fields in the alert source's [alert templates](https://docs.ilert.com/alerting/configure-alerting/alert-sources.md#alert-template) and [dynamic priority mapping](https://docs.ilert.com/alerting/configure-alerting/alert-sources.md#dynamic-priority-mapping).


---

# Agent Instructions
This documentation is published with GitBook. GitBook is the documentation platform designed so that both humans and AI agents can read, navigate, and reason over technical content effectively. Learn more at gitbook.com.

## Querying This Documentation
If you need additional information that is not directly available in this page, you can query the documentation by asking a question.

Perform an HTTP GET request on the following URL with the `ask` and `goal` query parameters:

```
GET https://docs.ilert.com/integrations/inbound-integrations/sentinelone.md?ask=<question>&goal=<user_goal>
```

`ask` is the immediate question: it should be specific, self-contained, and written in natural language.
`goal` is what the user is ultimately trying to achieve, the reason they need the answer. Sharing it helps GitBook give you a better, more relevant answer. A goal is most helpful when it describes the outcome the user wants rather than restating the question. For example, with `ask=how do I create an API token`, a goal like `automate deployments from our CI pipeline` lets GitBook tailor the answer to that use case.

The response will contain a direct answer to the question and relevant excerpts and sources from the documentation.

Use this mechanism when the answer is not explicitly present in the current page, you need clarification or additional context, or you want to retrieve related documentation sections.
