> For the complete documentation index, see [llms.txt](https://docs.ilert.com/llms.txt). Markdown versions of documentation pages are available by appending `.md` to page URLs; this page is available as [Markdown](https://docs.ilert.com/getting-started/quick-start-guide.md).

# Quick start

This guide takes you from an empty account to a real alert on your phone. It takes about 10 minutes.

By the end you will have:

* an **alert source** that receives events from your tools
* an **escalation policy** that decides who gets paged, and when
* verified **notification channels** on your own profile
* a **test alert** that reached you, which you then resolve

## Before you begin

* An ilert account. [Sign up](https://app.ilert.com/signup) if you do not have one.
* Your phone, to receive and verify notifications.
* A terminal with `curl`, if you want to send the test event yourself rather than through a monitoring tool.

## Create an alert source

An alert source is the connection between a tool and ilert. It receives events, decides whether each one becomes an alert, and hands that alert to an escalation policy.

{% stepper %}
{% step %}

## Open the alert source wizard

In the sidebar, go to **Alerting** → **Alert sources**, then click **Create new alert source**.
{% endstep %}

{% step %}

## Select an integration

Pick the tool that will send events. Use the search box or the category filters to narrow the list.

If you are only testing, choose **API** — it accepts any JSON payload you send it, so you do not need a monitoring tool wired up yet. **Email** is the other good starting point, because almost every tool can send email.

Click **Next**.
{% endstep %}

{% step %}

## Name it and assign a team

Give the alert source a name that identifies the system the alerts come from, not the tool that sends them — `Checkout API` tells an on-call responder more at 3am than `Prometheus` does.

Assigning a team is optional here, and controls who can manage the alert source and its settings. Click **Next**.
{% endstep %}

{% step %}

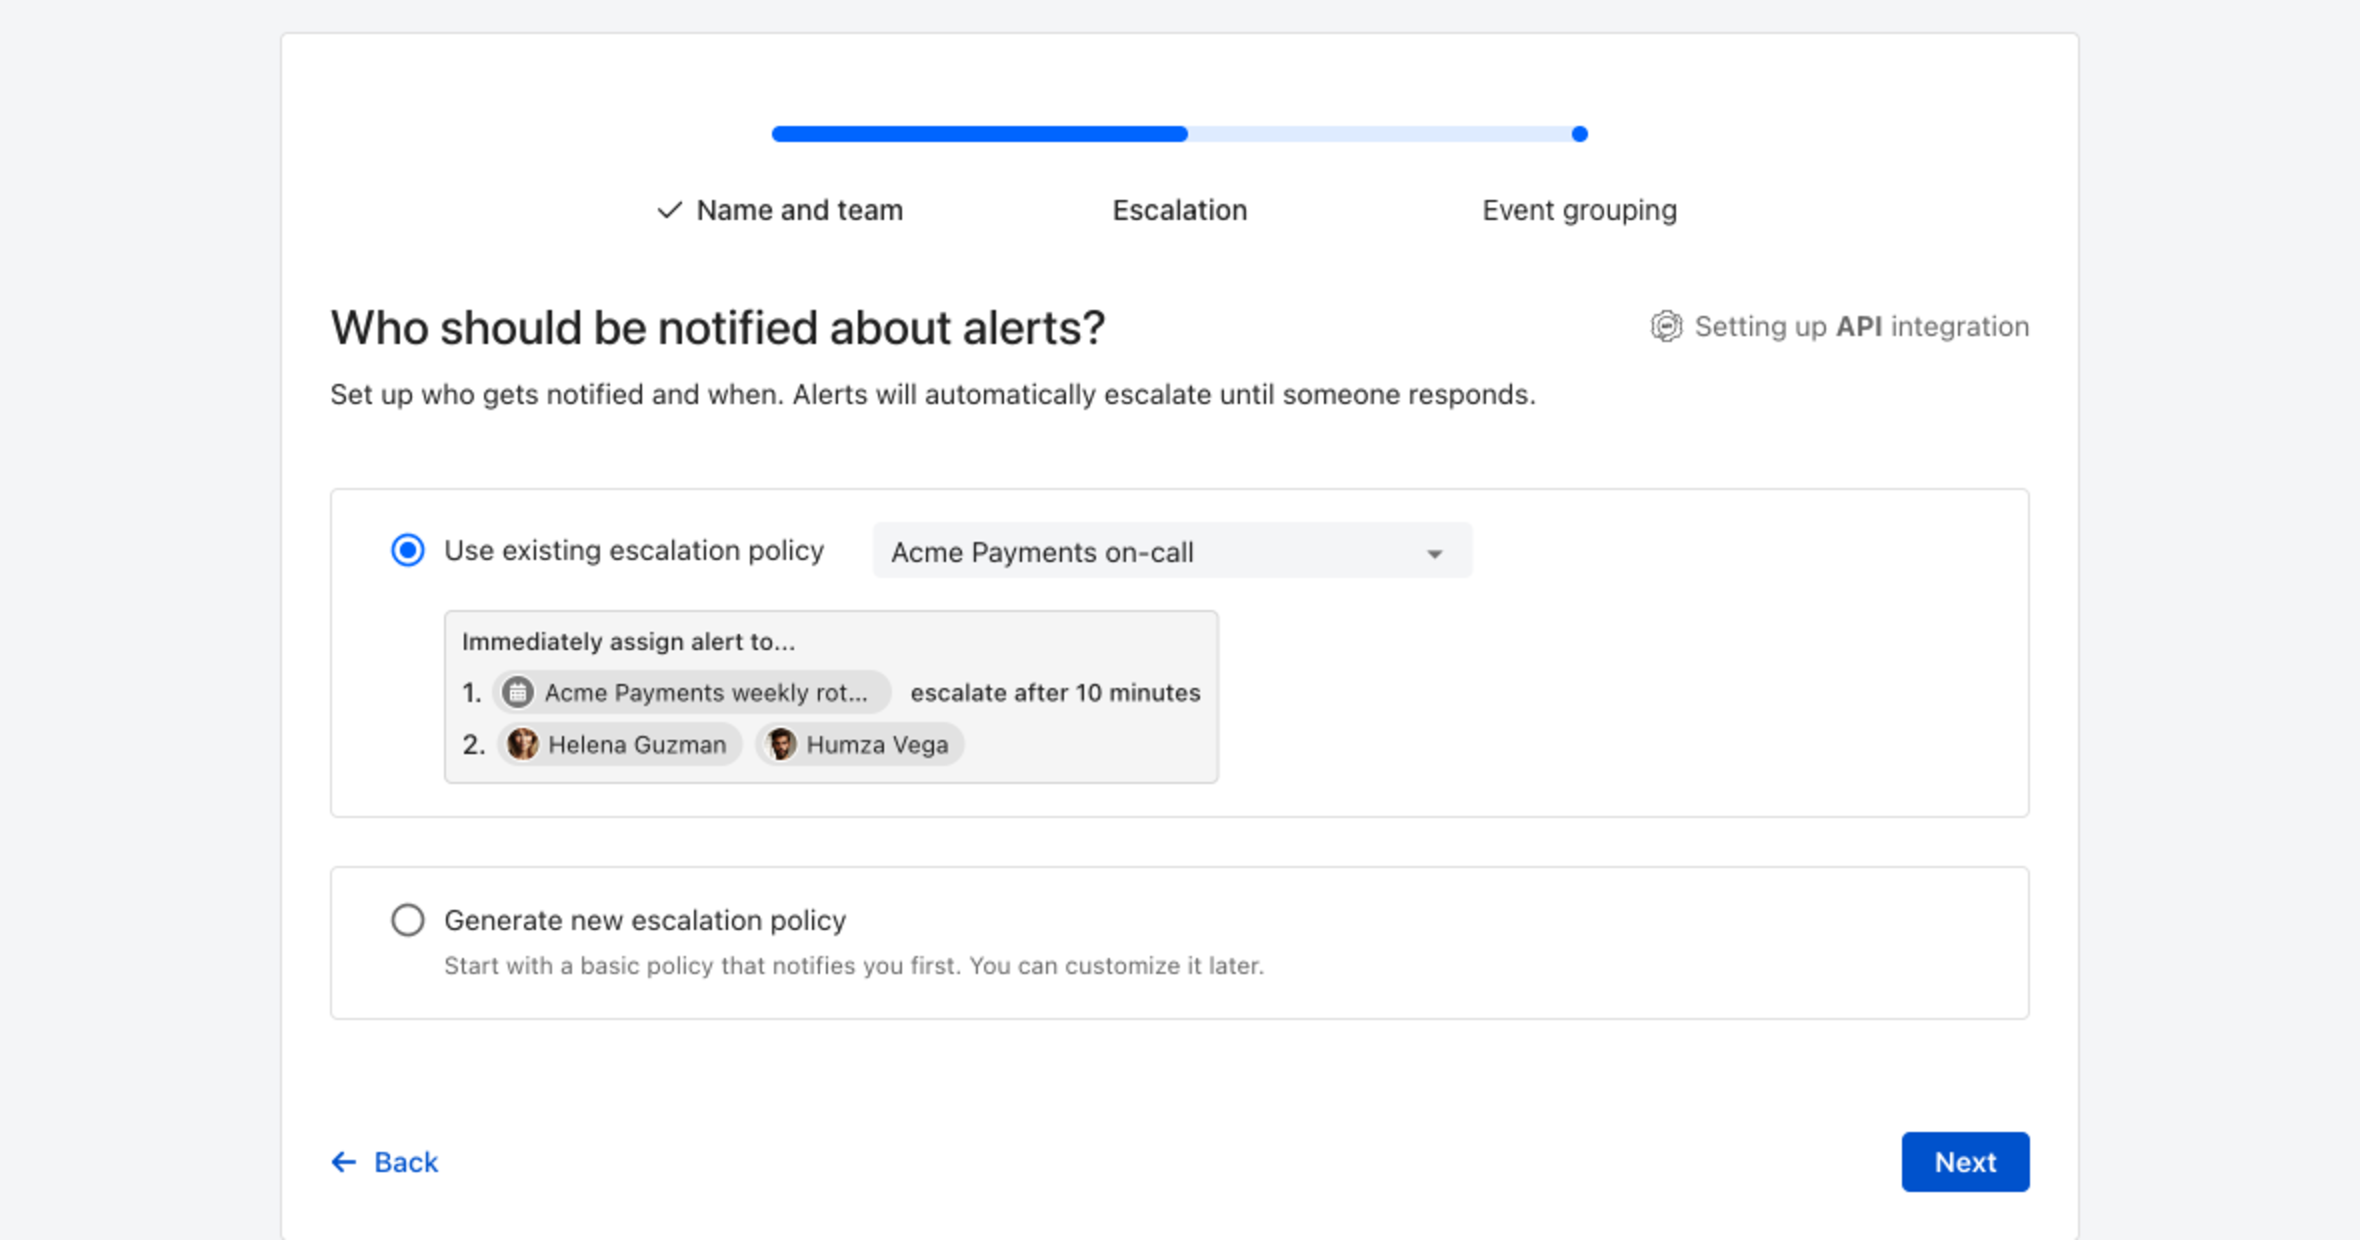
## Choose who gets notified

Under **Who should be notified about alerts?**, either select an existing policy or choose **Generate new escalation policy**, which creates a basic policy that notifies you first.

When you select an existing policy, ilert previews the escalation chain underneath it, so you can confirm who is paged before any alert exists.

<figure><img src="/files/uxfTMdaOK7Z5h8Bmyxwj" alt="The Escalation step of the wizard. An existing policy named Acme Payments on-call is selected, and a preview shows the alert going first to the Acme Payments weekly rotation, escalating after 10 minutes to Helena Guzman and Humza Vega."><figcaption><p>The preview shows the full escalation chain: the on-call rotation first, then two named responders after 10 minutes.</p></figcaption></figure>

Click **Next**.
{% endstep %}

{% step %}

## Choose how events are grouped

Grouping decides how many alerts a stream of events produces. Pick one:

| Option                          | Behavior                                                                              |
| ------------------------------- | ------------------------------------------------------------------------------------- |
| **Smart grouping (AI-powered)** | Groups similar events by analyzing their content, within a grouping window you choose |
| **Time-based grouping**         | Groups every event that arrives within a time window, or until the alert is accepted  |
| **Default grouping**            | Groups by the alert key that the integration sets                                     |

**Auto-resolution** is separate, and optional: it resolves alerts that stay open longer than the period you set.

None of this is permanent — change the grouping mode on the alert source at any time.

Click **Continue setup**.
{% endstep %}

{% step %}

## Finish setup

The wizard hands you to the full settings page, where you can set alert templates, notification priority, and dynamic routing. None of it is required now.

Click **Finish setup** to save the alert source.
{% endstep %}
{% endstepper %}

{% hint style="info" %}
Until you click **Finish setup**, the alert source shows a **FINISH SETUP** badge in the list. It still receives events — the badge only marks that you have not been through the settings page.
{% endhint %}

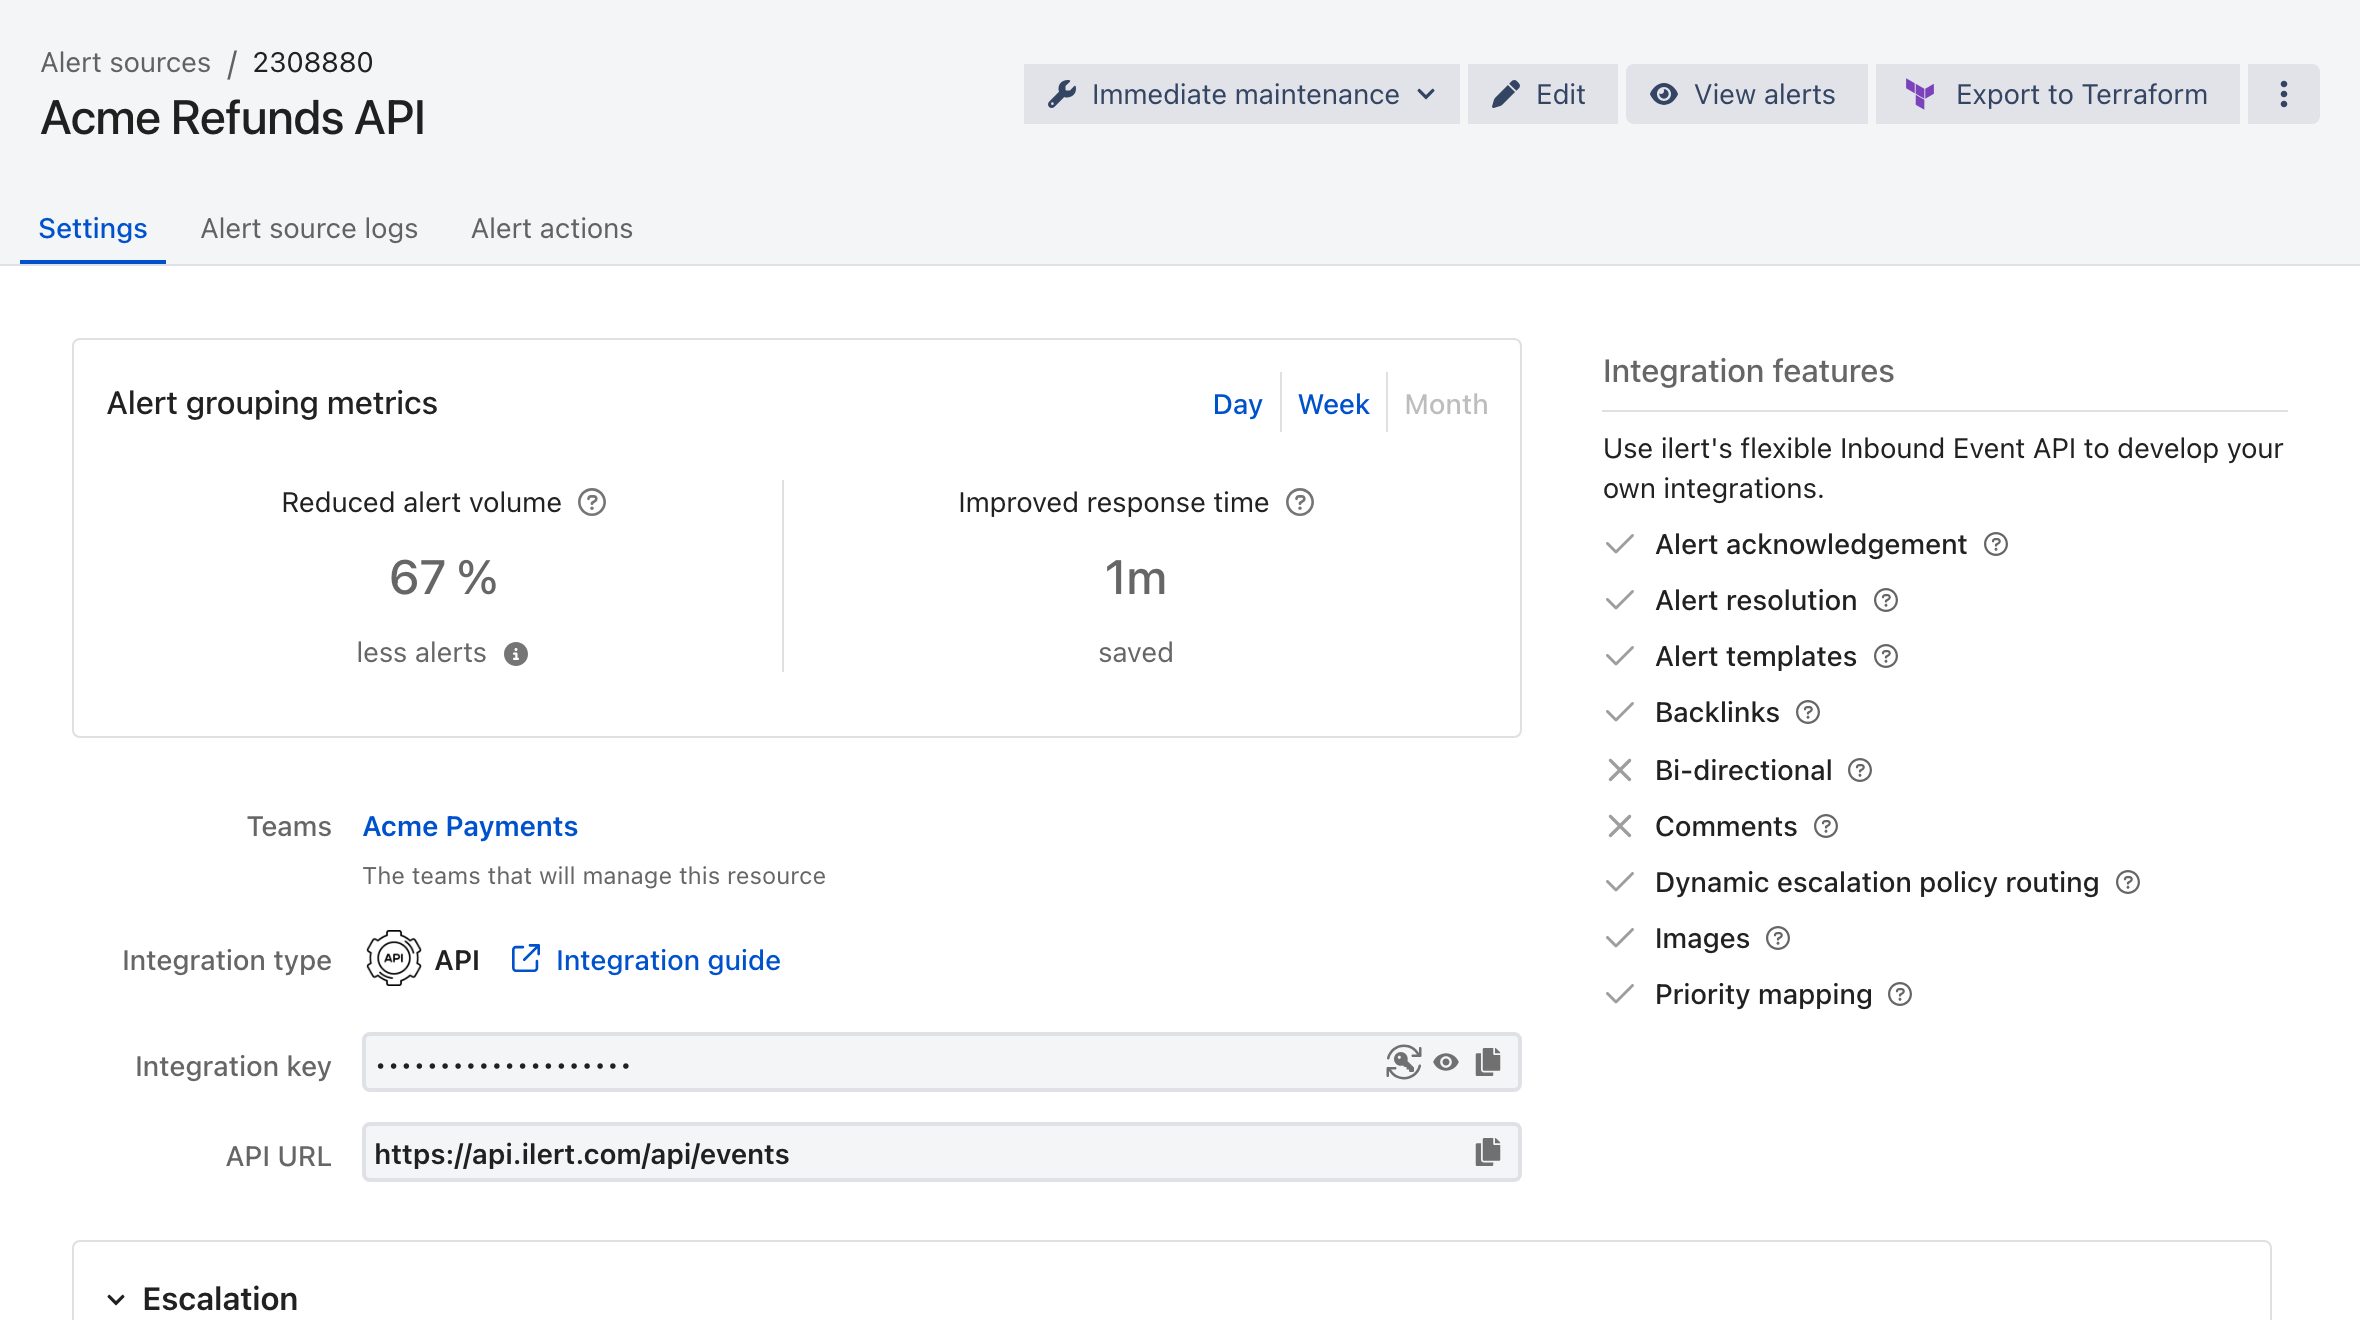
## Get your integration key

The alert source detail page has everything you need to send events.

<figure><img src="/files/BaZSFEVEdobJjdZ4otrU" alt="The Settings tab of an alert source named Acme Refunds API, showing the team, the API integration type, a masked integration key with reveal and copy buttons, the API URL https://api.ilert.com/api/events, and the assigned escalation policy."><figcaption><p>The <strong>integration key</strong> is masked by default. Use the eye icon to reveal it and the copy icon to copy it.</p></figcaption></figure>

Copy the **integration key**. You will send it with every event.

{% hint style="warning" %}
The integration key identifies the alert source and lets anyone who holds it create alerts in your account. Treat it like a password: keep it out of source control, and rotate it with the regenerate icon if it leaks.
{% endhint %}

## Set up your notifications

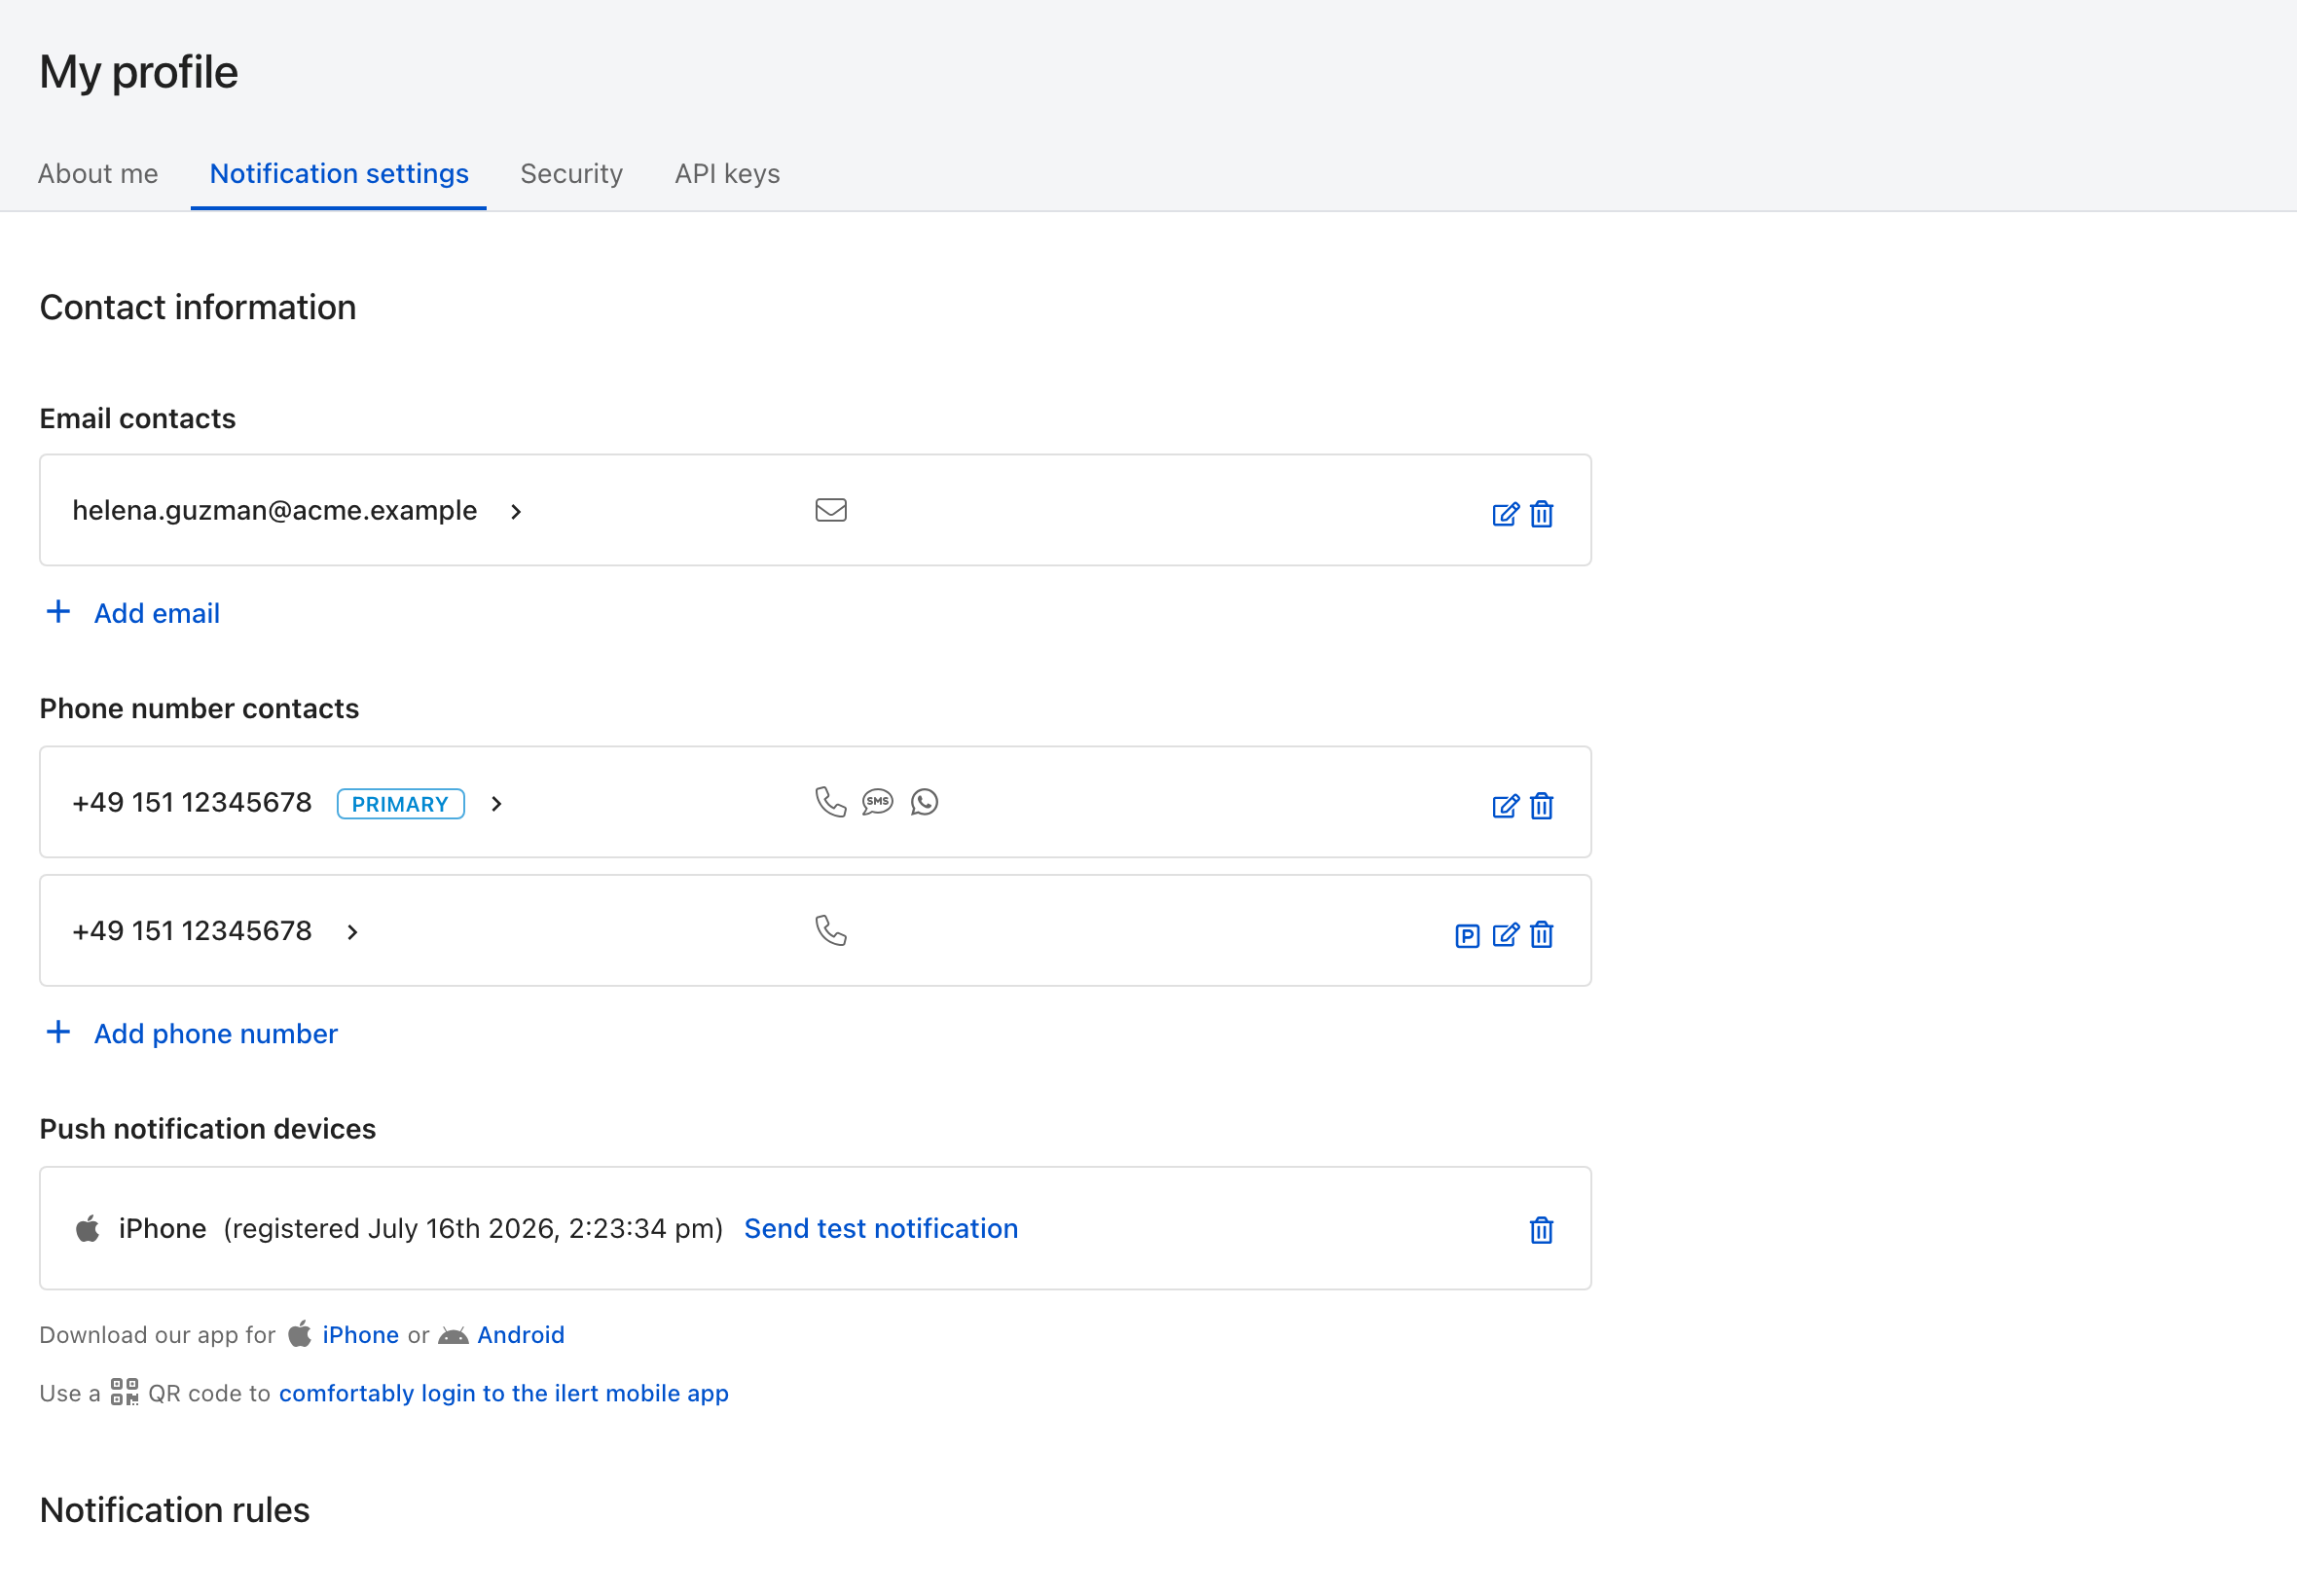
An alert that pages nobody is not much use. Before you test, make sure ilert can reach you.

Open the user menu in the top right, then click **Notification settings**.

<figure><img src="/files/DPhrNH35ftfgViuYt579" alt="The Notification settings tab of My profile, listing email contacts, phone number contacts with call, SMS and WhatsApp channels, and registered push notification devices each with a Send test notification link."><figcaption><p>Add and verify the channels you want to be paged on, then set notification rules below.</p></figcaption></figure>

1. Add and verify a phone number under **Phone number contacts** if you want calls or SMS.
2. Install the mobile app for push notifications — [iOS](https://apps.apple.com/app/ilert/id542915864) or [Android](https://play.google.com/store/apps/details?id=de.ilert.client.iphone) — then use **Send test notification** to confirm the device works.
3. Under **Notification rules**, set what happens when a high-priority alert is assigned to you, and how it differs from a low-priority one.

## Send a test event

Replace `YOUR_INTEGRATION_KEY` with the key you copied, and run:

```bash
curl -X POST https://api.ilert.com/api/events \
  -H "Content-Type: application/json" \
  -d '{
    "integrationKey": "YOUR_INTEGRATION_KEY",
    "eventType": "ALERT",
    "summary": "Refund webhook backlog above threshold",
    "details": "3,412 refund webhooks pending delivery. Oldest is 18 minutes behind."
  }'
```

Only three fields are required: `integrationKey`, `eventType`, and `summary`. The Events API authenticates with the integration key in the body, so there is no `Authorization` header.

{% hint style="warning" %}
**A `202` does not mean an alert was created.**

The Events API answers `202 Accepted` with an empty body — your event was queued, not processed. You get no alert ID, and an event that the alert source later filters or rejects returns exactly the same `202`. The outcome is recorded in the alert source's **Alert source logs** tab, never in the response.

Keep the `correlation-id` response header if you need to ask support what happened to a specific event.
{% endhint %}

For JavaScript, Python, and the full field reference, see [Creating alerts through events](/developer-docs/api-samples/creating-alerts-through-events.md).

## Confirm it worked

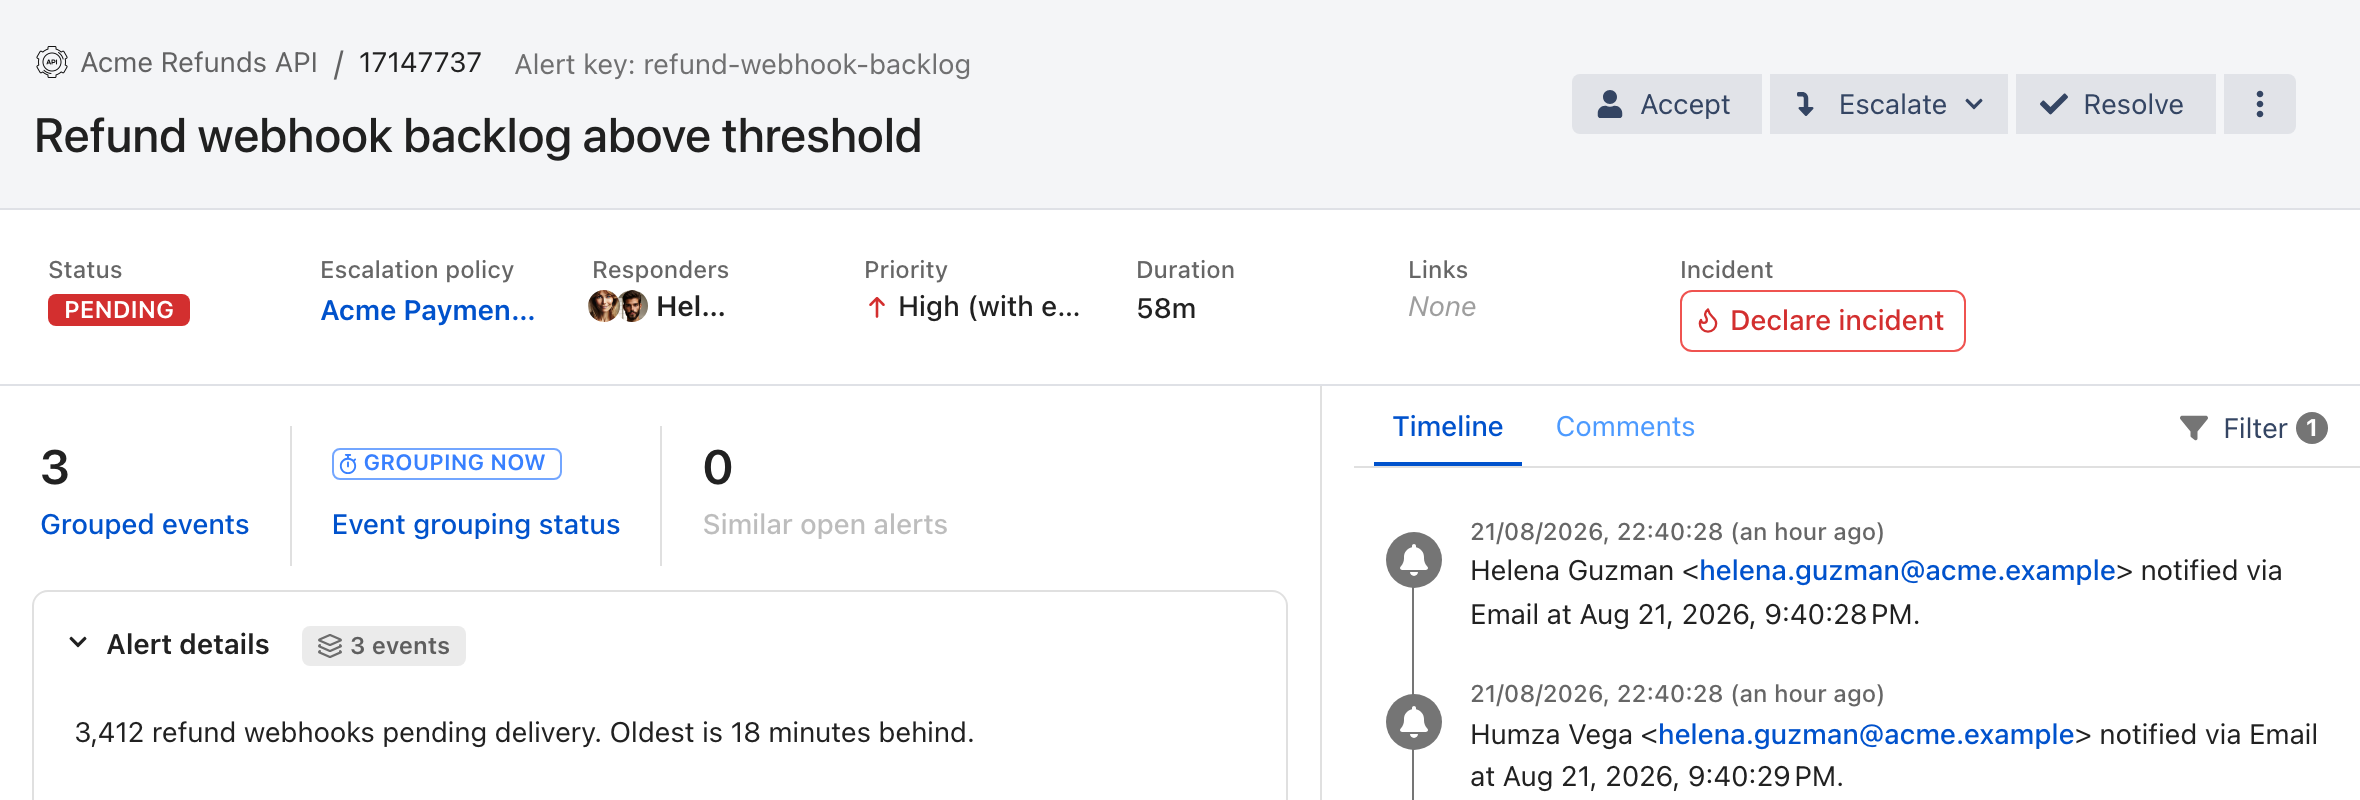
Go to **Alerts** in the top navigation and open the alert you just created.

<figure><img src="/files/WurFxOrv7NiQ8oFzaRcl" alt="An alert detail view titled Refund webhook backlog above threshold, showing status PENDING, its escalation policy, the responder Helena, high priority, and Accept, Escalate and Resolve buttons."><figcaption><p>A newly created alert is <code>PENDING</code> and escalating. The timeline records every notification sent.</p></figcaption></figure>

Check three things:

* **Status** is `PENDING` — the alert is live and escalating.
* **Responders** names the person the escalation policy picked. If your policy targets an on-call schedule, this is whoever is on call right now.
* The **Timeline** on the right lists each notification as it goes out, including the channel it used.

Then finish the lifecycle:

* **Accept** the alert to take ownership. This **halts escalation** — ilert treats an accepted alert as owned by a human and stops paging anyone else.
* **Resolve** it when the underlying problem is fixed. A resolved alert cannot be reopened; a later event creates a new one.

{% hint style="success" %}
If the alert reached your phone and you resolved it, your setup works end to end: a tool can now page the right person, and escalate if that person does not respond.
{% endhint %}

## What's next

<table data-view="cards"><thead><tr><th></th><th></th><th data-hidden data-card-target data-type="content-ref"></th></tr></thead><tbody><tr><td><strong>Connect your real tools</strong></td><td>Over 180 inbound integrations, from Prometheus and Datadog to Jira and ServiceNow.</td><td><a href="/pages/bAWYuzIaPzOb05464Xy5">/pages/bAWYuzIaPzOb05464Xy5</a></td></tr><tr><td><strong>Build an on-call schedule</strong></td><td>Rotate responsibility across your team instead of naming individuals.</td><td><a href="/pages/-MUluo7xv_kdaHEuns5d">/pages/-MUluo7xv_kdaHEuns5d</a></td></tr><tr><td><strong>Tune your escalation policy</strong></td><td>Add levels, delays, and routing keys so the right people are paged.</td><td><a href="/pages/mnYNEZKC2V9fk1po01Pv">/pages/mnYNEZKC2V9fk1po01Pv</a></td></tr><tr><td><strong>Cut alert noise</strong></td><td>Grouping, event filters, and support hours to stop paging on things that do not need a human.</td><td><a href="/pages/J3y3tEP563wQvwa27nO1">/pages/J3y3tEP563wQvwa27nO1</a></td></tr><tr><td><strong>Alert in Slack or Teams</strong></td><td>Receive alerts and respond to them without leaving chat.</td><td><a href="/pages/Npg15Cyo3s3rlfgmriRx">/pages/Npg15Cyo3s3rlfgmriRx</a></td></tr><tr><td><strong>Something not working?</strong></td><td>Fixes for events that never arrive and notifications that never land.</td><td><a href="/pages/RvLiDdSBTmZV1eLpBsjh">/pages/RvLiDdSBTmZV1eLpBsjh</a></td></tr></tbody></table>


---

# Agent Instructions
This documentation is published with GitBook. GitBook is the documentation platform designed so that both humans and AI agents can read, navigate, and reason over technical content effectively. Learn more at gitbook.com.

## Querying This Documentation
If you need additional information that is not directly available in this page, you can query the documentation dynamically by asking a question.

Perform an HTTP GET request on the current page URL with the `ask` query parameter, and the optional `goal` query parameter:

```
GET https://docs.ilert.com/getting-started/quick-start-guide.md?ask=<question>&goal=<endgoal>
```

`ask` is the immediate question: it should be specific, self-contained, and written in natural language.
`goal` is optional and describes the broader end goal you are ultimately trying to accomplish on behalf of the user. GitBook uses it to tailor the answer towards what is most useful for that goal.

The response will contain a direct answer to the question and relevant excerpts and sources from the documentation.

Use this mechanism when the answer is not explicitly present in the current page, you need clarification or additional context, or you want to retrieve related documentation sections.